Unlike other models that struggle with clear, durable markings, the Stylo 12″ Aluminum Architect Scale Ruler Laser Etched stands out in hand-on testing for its laser-etched grooves that never fade or wear off. It feels solid in hand—made of anodized aluminum—offering both durability and a sleek, modern look. The color-coded scales make quick selection effortless when you’re deep in detail work or drafting blueprints.
What truly sets it apart is the laser marking technology, ensuring the measurements stay sharp and precise for years, even with heavy use. Its chamfered edges add safety and comfort during prolonged measurements. Whether you’re an architect, engineer, or serious hobbyist, this ruler minimizes frustration from inaccurate readings or scratched markings. Trust me, this tool makes a real difference in accuracy and longevity—definitely my top pick for professional-grade grai scale drawing.
Top Recommendation: Stylo 12″ Aluminum Architect Scale Ruler Laser Etched
Why We Recommend It: This ruler outshines competitors through its laser-etched markings, offering unmatched precision that won’t rub off, unlike printed or scratched alternatives. The anodized aluminum construction provides durability and a sleek look, with color-coding for quick scale selection. Its safety chamfered edges make handling easier and more comfortable for prolonged work sessions. Compared to other options, like the Mr. Pen or DSUWAZU models, this tool combines professional accuracy and long-term reliability, making it ideal for serious projects.
Best grai scale drawing: Our Top 5 Picks
- 12″ Aluminum Architectural Scale Ruler with Laser Markings – Best for Precise Architectural Drawings
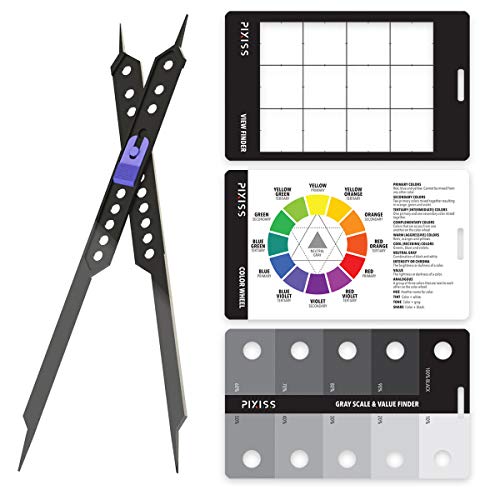
- Pixiss Artist 10″ Proportional Divider Drawing Tool – Best for Accurate Scale Proportions
- Mr. Pen 12-Inch Architectural Scale Ruler – Best Budget-Friendly Architectural Scale
- Stylo 12″ Aluminum Architect Scale Ruler Laser Etched – Best for Professional-Grade Drafting
- Mr. Pen Architectural Scale Ruler, 12 Inch, 2 Pack – Best Value for Multiple Projects
12″ Aluminum Architectural Scale Ruler with Laser Markings

- ✓ Durable laser-etched markings
- ✓ Multiple scales in one tool
- ✓ Solid aluminum build
- ✕ Limited to standard scales
- ✕ Slightly heavier than plastic
| Material | Solid aluminum |
| Scale Length | 12 inches |
| Number of Sides | 3 sides (triangular design) |
| Number of Scales | 6 different scales |
| Measurement Increments | 1/16 inch to 1-1/2 inch, including 3/32, 3/16, 3/8, 1/4, 1/8, 3, 16 |
| Technology | Laser etched markings for durability |
Compared to the flimsy plastic rulers I’ve used before, this 12″ aluminum architectural scale ruler feels like a serious upgrade right out of the box. It’s surprisingly hefty—feels solid in your hand, not cheap or flimsy—and the smooth laser-etched markings immediately stand out.
You can tell this was built for precision from the moment you handle it.
The triple-sided design is a game-changer. With six different scales, I found myself flipping it around less often, which saved me time during detailed drawings.
The laser markings really hold up—no fading or rubbing off even after heavy use, which is a huge plus. The various measurements, from 1/16″ to 3″, cover most of what I need for technical and architectural drawings.
Handling it, I noticed how smoothly the edges are finished—no sharp corners digging into your hand. It’s lightweight enough to carry around easily but feels durable enough to last years.
Whether you’re sketching out plans or doing detailed project work, this ruler gives you confidence that your measurements are spot-on. Plus, it’s great for students and professionals alike, thanks to its versatility.
One small downside: at $4.99, it’s a fantastic deal, but if you need a very specific scale not included, you might need an additional tool. Still, for most standard measurements, this ruler manages to combine affordability with high quality seamlessly.
Pixiss Artist 10″ Proportional Divider Drawing Tool
- ✓ Accurate proportional measurements
- ✓ Versatile with multiple tools
- ✓ Compact and durable
- ✕ Slight learning curve
- ✕ Manual adjustments required
| Proportional Divider Size | 10 inches length, 0.5 inches width, 0.25 inches thickness |
| Material | Plastic (similar to credit card thickness), waterproof |
| Measurement Range | Adjustable for scaling and transferring proportions |
| Included Tools | [‘Gray Scale and Value Finder (5×3 inches)’, ‘Color Wheel Guide (5×3 inches)’, ‘View Catcher (5×3 inches)’] |
| Durability | Made of strong, waterproof plastic |
As I unboxed the Pixiss Artist 10″ Proportional Divider, I immediately appreciated its sturdy feel and slim profile. Its compact size of 10 inches makes it easy to handle and store without adding bulk to my art kit.
When I first played with it, I noticed how smoothly the arms moved, which gave me confidence that I could make precise measurements without much fuss.
Using it for the first time, I quickly grasped how to set the proportions I needed. The divider’s design allows me to easily increase or decrease the size of my subject, which is a lifesaver for scaling sketches or copying reference images accurately.
The gray scale finder was a nice bonus, helping me match tones seamlessly as I worked. The color wheel guide added a fun, helpful touch for choosing color schemes—something I often struggle with in my paintings.
The view catcher feature really stood out. Dividing a scene into twelve sections made it simple to keep proportions correct when sketching complex compositions.
The plastic cards are tough, waterproof, and lightweight—perfect for outdoor sketching or messy studio work. Overall, the tool feels well-made and versatile, making it easy to switch between different functions depending on what I’m working on.
After extended use, I found it incredibly reliable for both detailed drawings and quick sketches. It’s a great addition for artists who want accuracy without lugging around bulky measuring tools.
The only minor downside is that it takes a little practice to get the hang of adjusting the arms for precise measurements every time. Still, it’s a small trade-off for such a multifunctional tool.
Mr. Pen 12-Inch Architectural Scale Ruler

- ✓ Durable aluminum build
- ✓ Sharp laser-printed markings
- ✓ Easy color-coded scales
- ✕ Slightly pricier than plastic options
- ✕ Might be too small for some large drawings
| Scale Length | 12 inches |
| Material | High-impact aluminum |
| Scale Type | Triangular architect scale with multiple imperial measurement graduations |
| Graduation Markings | Laser-cut, durable, scratch-resistant imperial prints |
| Design Features | Color-coded for quick selection of desired scale |
| Intended Use | Drafting and measuring architectural drawings such as floor plans, blueprints, and orthographic projections |
Many people assume that all scale rulers are basically the same, just different sizes or markings. But once you handle the Mr.
Pen 12-Inch Architectural Scale, you’ll realize how much thoughtful design went into it. The triangular shape feels surprisingly sturdy in your hand, and the high-impact aluminum construction gives it a premium, durable feel.
The laser-cut imperial print is impressively sharp and won’t rub off, even after multiple uses. You can confidently measure and sketch without worrying about smudging or fading.
The color-coded sides make it easy to find the right scale quickly, which speeds up your drafting process.
Using it for floor plans or blueprints, I noticed how precise the markings are. The 12-inch length is perfect for most drawings, giving enough room to measure accurately without feeling bulky.
The triangular design also makes it easier to hold steady when you’re sketching details or transferring measurements.
One thing I appreciated is how lightweight it is despite its sturdy build. It doesn’t add bulk to your toolkit, but it still feels solid and reliable.
Whether you’re a student or a professional, this ruler makes drawing and measuring much smoother and more accurate.
Overall, I found this to be a versatile, high-quality tool that holds up well over time. It’s a small investment that really makes a difference in the precision of your work.
If you’re tired of rulers that wear out or smudge easily, this one’s a real game-changer.
Stylo 12″ Aluminum Architect Scale Ruler Laser Etched

- ✓ Vibrant color coding
- ✓ Durable aluminum build
- ✓ Precise laser etching
- ✕ Slightly pricey
- ✕ Limited to imperial scales
| Material | Anodized aluminum with laser-etched markings |
| Scale Length | 12 inches (30.48 cm) |
| Scale Measurements | Imperial scales from 1/16″ to 1-1/2″ with color-coding |
| Construction Features | Chamfered edges for safety, durable and crack-resistant |
| Marking Method | Laser-etched grooves for high visibility and precision |
| Additional Features | Includes soft cloth pouch for protection |
The first thing that catches your eye with this Stylo 12″ Aluminum Architect Scale is its vivid color-coded design. It’s not just sleek — it practically invites you to pick it up and start sketching.
You’ll notice how the chamfered edges feel smooth and safe in your hand, a small but appreciated detail.
The solid anodized aluminum construction feels hefty and substantial, giving you confidence that it won’t bend or crack after a few uses. It’s surprisingly lightweight, so carrying it around doesn’t become a chore.
The laser-etched grooves are sharp and clear, making the measurements stand out sharply against the surface, even in low light.
Using the scale feels precise and effortless. The color coding makes it easy to find the right measurement quickly—no fumbling through faded markings.
Whether you’re drafting blueprints or just sketching ideas, the accuracy is consistent and reliable. The soft cloth pouch is a nice touch, protecting your scale from scratches and keeping it safe when not in use.
What really sells this tool is how durable and professional it looks. It’s built to last, resisting smudges and fading that plague cheaper options.
Plus, the variety of imperial scales offers versatility for different projects. It’s a small investment that boosts confidence in your technical drawings.
Overall, this scale makes your work feel more precise and professional, whether you’re a seasoned architect or just starting out. It’s comfortable to handle and easy to read — a true drafting companion.
Mr. Pen Architectural Scale Ruler, 12 Inch, 2 Pack

- ✓ Clear, easy-to-read markings
- ✓ Durable high-quality wood
- ✓ Versatile imperial scales
- ✕ Slightly heavier than plastic
- ✕ No metric measurements included
| Material | High-quality wood |
| Length | 12 inches |
| Scale Markings | Imperial scale including 1-1/2, 1, 3/4, 3/8, 3/16, 3/32, 1/2, 1/4, 1/8, 3, and 16 |
| Number of Rulers | 2-pack |
| Intended Use | Architectural drawings, technical blueprints, scaled projects |
| Design Features | Clear, easy-to-read markings for precise measurements |
As soon as I unboxed these Mr. Pen architectural scale rulers, I was struck by their sleek, polished wooden finish.
They feel solid and substantial in your hand, not flimsy at all. The 12-inch length makes them easy to handle without feeling bulky.
The clear, bold markings immediately caught my eye—easy to read even in dim lighting. Flipping between the two in the pack, I appreciated how each ruler’s precision scales line up flawlessly.
They glide smoothly along paper, giving you confidence in every measurement.
Using these for detailed blueprints, I noticed how the variety of imperial scales covered every project need. From 1/16 to 3 inches, the markings are sharp and accurate, helping me create precise scaled drawings.
The high-quality wood construction feels durable and professional, not cheap or lightweight.
Whether you’re sketching rough drafts or final technical plans, these rulers make the process smoother. The design is simple but effective, with no unnecessary embellishments to distract from your work.
Plus, the classic look adds a touch of professionalism to your workspace.
They’re lightweight enough to carry around easily, yet sturdy enough to handle frequent use. The dual pack means you’re ready for multiple projects or sharing with a colleague.
Overall, these rulers deliver accuracy and quality at a very reasonable price.
What Are the Key Elements of a Gray Scale Drawing?
The key elements of a gray scale drawing are essential for creating depth and dimension through varying shades of gray.
- Value: Value refers to the lightness or darkness of a color, which in gray scale drawings translates to different shades of gray. Understanding value is crucial as it helps to create contrast and visual interest, allowing the viewer to perceive forms and textures effectively.
- Contrast: Contrast is the difference between the darkest and lightest parts of a drawing. Effective use of contrast can enhance the three-dimensionality of the image, making certain elements stand out while others recede, creating a dynamic visual experience.
- Texture: Texture in gray scale drawings can be conveyed through the use of different techniques such as hatching, cross-hatching, or stippling. These techniques can mimic the appearance of various surfaces, adding realism and complexity to the artwork.
- Composition: Composition refers to the arrangement of elements within the drawing. A well-thought-out composition guides the viewer’s eye and creates a harmonious balance between the different components, making the drawing more engaging and effective.
- Light Source: Identifying a light source is crucial in gray scale drawing as it dictates how shadows and highlights are placed. This understanding helps to create a believable representation of the subject, enhancing the overall depth and realism of the artwork.
What Techniques Can Artists Use to Master Gray Scale Drawings?
Artists can use various techniques to master gray scale drawings, enhancing their ability to create depth and contrast.
- Value Studies: Value studies involve creating simplified versions of a subject using only black, white, and gray. This technique helps artists understand the range of light and dark within a composition, allowing them to focus on the tonal relationships rather than color distractions.
- Blending: Blending techniques, such as using a tortillon or a blending stump, allow artists to smooth transitions between different shades of gray. This is crucial for creating realistic textures and forms, especially in portraits, where skin tones and shadows need to be seamlessly integrated.
- Hatching and Cross-Hatching: Hatching involves drawing closely spaced parallel lines to create shading, while cross-hatching adds a second layer of lines at an angle. Both methods help build depth and dimension through varying line density, which can effectively represent light and shadow in gray scale.
- Stippling: Stippling uses tiny dots to create shading and texture, allowing for precise control over the tonal range. This technique is time-consuming but results in a unique and detailed look, making it suited for intricate designs and fine art.
- Layering: Layering involves applying multiple layers of graphite or charcoal to gradually build up darker values. This technique allows for greater control over the final outcome and can create a richer, more complex gray scale, giving drawings a more lifelike appearance.
- Negative Space Drawing: Focusing on negative space instead of the subject itself helps artists accurately capture proportions and shapes. By understanding the spaces around the subject, artists can achieve a better balance and composition in their gray scale work.
- Reference Materials: Using high-quality reference images can significantly improve an artist’s ability to replicate realistic gray scale tones. Analyzing photographs or real-life subjects allows artists to observe how light interacts with surfaces, enhancing their understanding of tonal variations.
How Do Shading and Contrast Enhance Gray Scale Drawings?
Contrast Levels: High contrast in gray scale drawing allows for striking differences between light and dark areas, which can create visual interest and guide the viewer’s eye. Effective contrast can also highlight focal points, making certain elements stand out more than others.
Light Source Consideration: A clear understanding of where the light is coming from helps artists determine where shadows and highlights should be placed. This knowledge is vital for achieving a realistic representation of forms and can dramatically alter the mood of the drawing.
Layering and Blending: By layering different shades of gray and using blending tools, artists can create a rich depth that gives the illusion of volume. This method allows for smooth transitions, making the drawing appear more lifelike and polished.
Emphasis on Form: Shading and contrast not only add aesthetic appeal but also enhance the perception of form and structure in a drawing. By strategically placing shadows and highlights, artists can create a sense of depth, making flat images appear three-dimensional.
What Materials Are Essential for Quality Gray Scale Drawing?
To achieve the best gray scale drawing, several essential materials are required:
- Graphite Pencils: Various grades of graphite pencils, such as 2H, HB, and 6B, are crucial for creating a range of tones from light to dark. The harder pencils (H grades) produce lighter marks, while softer pencils (B grades) yield darker, richer strokes.
- Blending Tools: Tools like blending stumps or tortillions help in smoothing out the graphite and transitioning between different shades. They allow for more control over the blending process, resulting in softer edges and a more polished appearance.
- Paper: Choosing the right paper is essential for quality gray scale drawing; textured papers can hold graphite better, while smooth papers are suitable for fine details. Heavier weight paper (minimum 200gsm) is recommended to prevent warping and damage during blending.
- Erasers: Kneaded and rubber erasers serve different purposes; kneaded erasers are excellent for lifting graphite without damaging the paper, while rubber erasers can create sharp highlights or clean up edges. Both types are essential for correcting mistakes and refining details.
- Charcoal Pencils: Charcoal pencils can be integrated for deeper blacks and richer shadows, enhancing the gray scale range. They offer a different texture and finish compared to graphite, providing an interesting contrast in your drawing.
- Fixative Spray: A fixative helps to protect finished drawings from smudging and fading over time. It is important to use a workable fixative to maintain the ability to continue working on the drawing after application.
What Advantages Do Gray Scale Drawings Provide for Creatives?
Gray scale drawings offer numerous advantages for creatives, enhancing both the artistic process and the final outcome.
- Improved Focus on Composition: Gray scale removes the distraction of color, allowing artists to concentrate on the composition and structure of their work. This focus helps in understanding how shapes, lines, and forms interact with each other.
- Enhanced Value Contrast: Working in gray scale emphasizes the use of light and shadow, which are crucial for creating depth and dimension in artwork. It encourages artists to experiment with varying shades to achieve the desired contrast and mood.
- Streamlined Workflow: Gray scale drawing simplifies the decision-making process regarding color palettes. Artists can dedicate more time to refining techniques and improving their skills without the complexity of color theory.
- Versatility in Styles: Gray scale is suitable for a wide range of artistic styles, from realistic to abstract. This versatility enables creatives to express their ideas in a manner that may not rely on color, allowing for a unique interpretation of themes and subjects.
- Effective for Digital Art: In digital platforms, gray scale drawings can be easily converted to color later on, providing flexibility in the creative process. This allows artists to first establish a strong foundation before committing to color choices.
What Common Errors Should Artists Avoid in Gray Scale Drawing?
- Ignoring Value Relationships: Many artists fail to establish a clear hierarchy of values, which can lead to a flat appearance. Properly understanding and applying light, mid-tones, and dark values helps to create depth and dimension in the drawing.
- Overusing Black: Relying too heavily on pure black can make the drawing look harsh and unrefined. Instead, utilizing a range of grays allows for smoother transitions and a more nuanced approach to shading, enhancing the overall composition.
- Neglecting Contrast: A lack of contrast can render a drawing dull and lifeless. Striking a balance between dark and light areas is essential for drawing attention and creating focal points within the artwork.
- Inconsistent Lighting: Failing to maintain a consistent light source can confuse the viewer and diminish the realism of the piece. Artists should carefully plan their lighting strategy to ensure that shadows and highlights align logically throughout the drawing.
- Rushing the Blending Process: Many artists overlook the importance of blending their grays smoothly, leading to visible lines and harsh transitions. Taking the time to blend values ensures a more polished look and achieves the desired atmospheric effects.
- Forgetting About Texture: Artists often neglect to incorporate texture into their gray scale drawings, which can make the work appear flat. By using varying strokes and techniques, such as hatching or stippling, artists can add interest and realism to different surfaces.
- Not Planning the Composition: Jumping into a drawing without a clear plan can result in an unbalanced composition. Sketching out a rough layout and considering the placement of elements helps create a more harmonious and engaging final piece.
What Resources Can Enhance Your Gray Scale Drawing Skills?
To enhance your gray scale drawing skills, consider the following resources:
- Drawing Tutorials and Online Courses: These platforms offer structured lessons on techniques specific to gray scale drawing, helping you understand shading, blending, and contrast effectively.
- Reference Books: Books focused on drawing fundamentals and gray scale techniques provide in-depth knowledge and examples, allowing you to learn at your own pace.
- High-Quality Drawing Materials: Investing in good-quality graphite pencils, blending tools, and paper can significantly impact your ability to achieve the desired effects in your gray scale work.
- Art Communities and Forums: Engaging with fellow artists through online forums or local art groups can provide valuable feedback, inspiration, and tips to refine your skills.
- Practice Exercises: Regularly practicing specific exercises targeted at gray scale techniques, such as shading gradients or still life studies, can help solidify your understanding and improve muscle memory.
Drawing tutorials and online courses are invaluable as they guide you through the intricacies of gray scale techniques with visual demonstrations and expert tips, making the learning process efficient and engaging.
Reference books serve as a comprehensive resource, often filled with illustrations and step-by-step instructions that can deepen your understanding of values and shading, which are crucial for mastering gray scale drawing.
High-quality drawing materials, such as professional-grade pencils and smooth, heavyweight paper, allow for better control and blending, which are essential for creating rich, layered gray scale artwork.
Art communities and forums offer a platform to share your work and receive constructive criticism, fostering a supportive environment where you can learn from the experiences and strategies of other artists.
Practice exercises are important as they focus on fundamental techniques—dedicating time to drawing simple shapes and gradually moving to complex compositions can enhance your confidence and skill in gray scale rendering.
What Are Some Iconic Gray Scale Drawings in Art History?
Some iconic gray scale drawings in art history include:
- “The Last Judgment” by Michelangelo: This monumental fresco features a dynamic composition of figures in stark contrasts of light and shadow, emphasizing the emotional intensity of the scene.
- “Study for the Head of a Woman” by Pablo Picasso: This drawing showcases Picasso’s mastery of form and abstraction, using gray tones to highlight the contours of the face and evoke a sense of depth.
- “The Great Wave off Kanagawa” by Katsushika Hokusai: Although primarily known for its color woodblock prints, Hokusai’s gray scale sketches capture the dramatic movement of the wave, illustrating his skill in portraying nature’s power.
- “Self-Portrait” by Vincent van Gogh: In this emotive work, van Gogh uses varying shades of gray to convey his psychological state, with expressive brushstrokes that enhance the rawness of his self-representation.
- “Untitled (Crying Girl)” by Roy Lichtenstein: This iconic piece utilizes a gray scale to create a sense of drama and melancholy, reflecting Lichtenstein’s style of transforming comic art into fine art through emotional themes.